SimFly offers its proprietary “SimFly Client” software free of charge, a sophisticated tool meticulously developed by SimFly to seamlessly integrate your chosen flight simulator with their state-of-the-art servers.
This unique solution ensures a comprehensive data exchange between the simulator (supported flight simulators list) and servers, enriching the flight experience with detailed monitoring and analysis of flight patterns, environmental factors, and airplane functionalities.
Free Download #
To facilitate the download and installation of the SimFly Client, please refer to the detailed step-by-step guide available in the text below.
To download the latest version of the SimFly Client, follow these simple and quick steps:
- Log in to the SimFly website
- Click on your username (top right corner) or the gear icon (Settings)

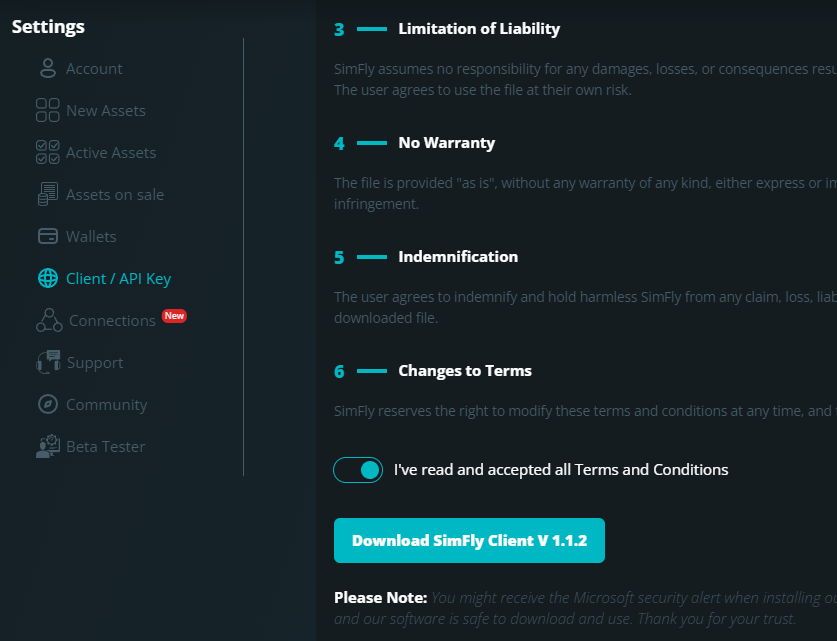
- From the left menu, select “Client / API Key”

- Scroll down past the installation help video
- Read and accept the terms and conditions by activating the checkbox
- Click on the download button, which also displays the latest released version
- Choose where to save the executable file
- Congratulations! You have successfully downloaded the SimFly Client
Installation #
For a successful installation of the SimFly Client, either refer to the above video tutorial or follow these straightforward steps:
- Ensure the Flight Simulator is Turned Off: before initiating the installation, make sure your flight simulator is completely shut down. This is crucial for a successful installation or update
- Run the exe file downloaded from the SimFly website
- Install for all users (recommended)
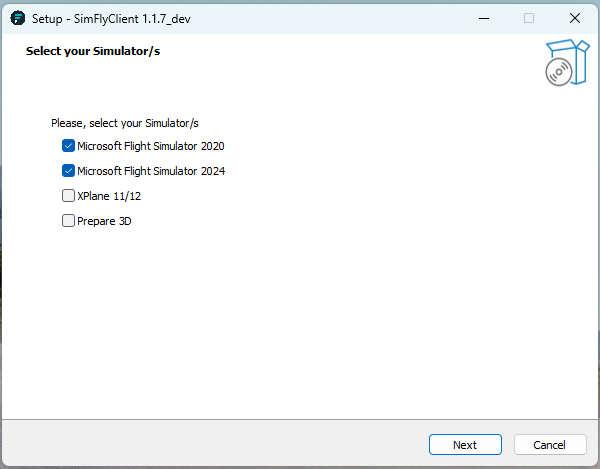
- Select the simulator(s) you use by checking the corresponding box(es)

- Press “Next”
- If you are using Xplane, select the ‘plugins’ folder and click “Next”
- If you are using MSFS2020/MSFS2024, you can enable the VR feature to view messages directly within the simulator. Ensure that once in the cockpit, the “SimFly” icon in the simulator’s top menu is active (Examples) to receive onboard notifications. If you wish to activate the VR feature, you will be prompted to specify your community folder. If you choose not to enable this feature, there is no need to activate the SimFly icon in the top menu.
- Press “Next”
- Decide whether to create a desktop shortcut (recommended)
- Click “Next”
- Upon completion, click “Install”
- Press “Finish”
- Congratulations! You have successfully installed the SimFly Client
Set Up #
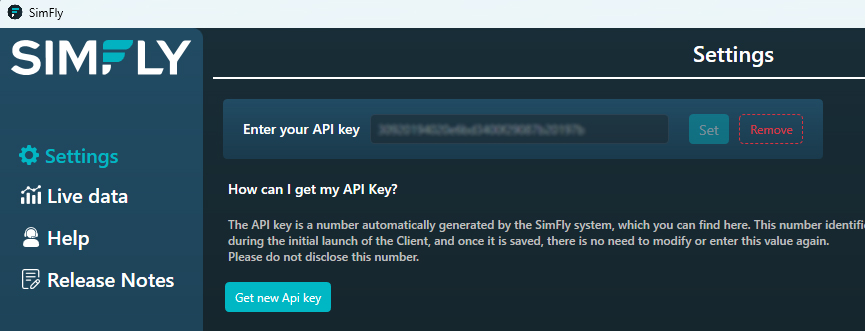
After installing the SimFly Client, launch it by running the “SimFlyClient.exe” file. To link your account to the SimFly Client, you need to obtain an API key from the SimFly website, copy it, and paste it into the “Settings” section of the SimFly Client.
The video tutorial provided above in this section also includes a guide on how to enter the API key.
The steps to follow for entering the API key are:
- Log in to the SimFly website
- Click on your username (top right corner) or the gear icon (Settings)

- From the left menu, select “Client / API Key”

- Scroll down to the bottom of the webpage to the “API Key” section
- Click the button “Generate API Key”
- A new 32-character API Key is generated, along with a timestamp indicating when it was created. Adjacent to the key, icons provide options to assign a name to the key, copy it, or delete it
- The last icon on the right displays the connection status: green indicates active and red indicates inactive
- Copy the new API Key and paste it into the SimFly Client “Settings” section
- Press the “Set” button
- Congratulations! You’ve successfully configured your API key. Everything is now operational and set for your inaugural flight
Client Status #
How can you check if everything is functioning properly? It’s straightforward: the SimFly Client features two indicators to monitor operational status in real-time.
In the lower left corner, a green chain ![]() symbolizes that your API key has been successfully recognized and correctly linked by our servers.
symbolizes that your API key has been successfully recognized and correctly linked by our servers.
If you see a red chain ![]() you need to verify your API key’s association, as it has not been recognized by our server.
you need to verify your API key’s association, as it has not been recognized by our server.
Another key indicator for your flights is the prominent label located always to the left of the SimFly Client, below the image of the control tower.
If you see “Disconnected” in red, it means that your simulator has not yet been started or you are in the game menu instead of on board your airplane.
Conversely, if “Broadcasting” appears in green, this indicates that the simulator is correctly connected and operational, transmitting and receiving data from our Client.

This same status indicator is also available in the upper right corner on the SimFly website.
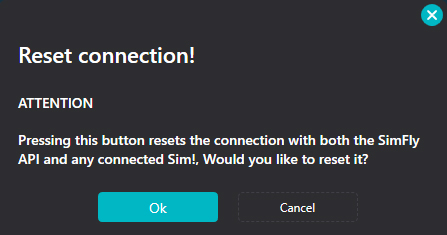
When the “Broadcasting” status is active, an icon with two red circular arrows ![]() will appear. By clicking on this icon, you can reset the connection if you encounter any connection problems.
will appear. By clicking on this icon, you can reset the connection if you encounter any connection problems.
However, it’s important to use this function cautiously: avoid pressing the icon if you’re not experiencing connectivity issues and especially not during a flight, as this could compromise the data collected during the mission.
Before proceeding with the reset, you will receive a confirmation message asking if you wish to continue.
Settings #
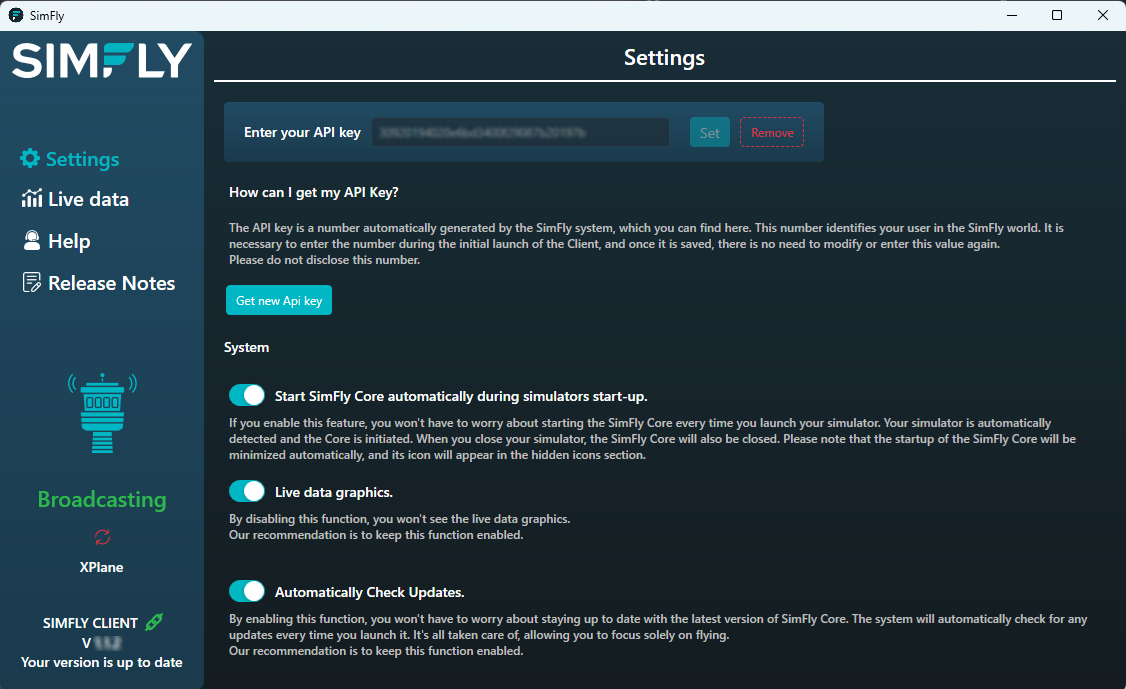
The “Settings” section features three essential switches that enable you to customize your experience with the SimFly Client.
The “Start SimFly Core automatically during simulator startup” option allows you to discreetly launch the SimFly Client each time you start your simulator. The Client automatically starts and minimizes to the hidden icons area in Windows, thus not interfering with your simulator’s loading process.
The “Live Data Graphics” toggle enables or disables the display of real-time dynamic graphs in the “Live Data” section. Displaying these graphs does not affect system performance.
Regarding the “Automatically Check for Updates” option, it is advisable to keep it active; it automatically checks for new releases of the Client and, if there are updates available, guides you through the installation of the latest updated version.
The three “In-Sim Popup” selectors allow you to choose whether to display SimFly messages within the simulator or above it. If the selector is active, the messages will be displayed inside the simulator.
Important: MSFS2020/MSFS2024 users cannot enable or disable this function with the simulator already started. Additionally, those who wish to view messages inside MSFS2020/MSFS2024 must ensure that the SimFly icon in the simulator’s top menu is active once aboard their aircraft (Examples).
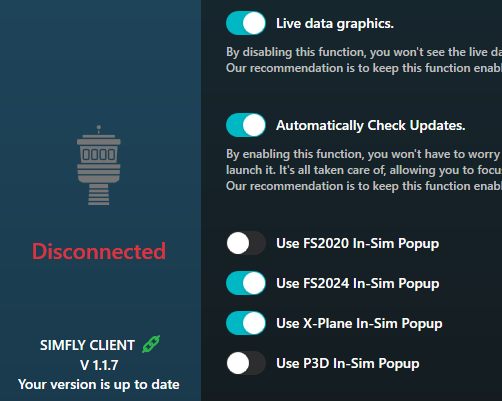
All settings are automatically saved directly in the SimFly Client.
Live Data #
The “Live Data” section displays real-time critical data of your airplane, such as Indicated Altitude, True Heading, Ground Speed, among others.
The graph located below these numerical data represents two specific parameters: Indicated Altitude and Ground Speed.
Additionally, beneath the graph, you will find a representation of the airplane as detected by the simulator.
How to Make Your Airplane Recognizable by the Client #
Since it is not possible to retrieve the ICAO code of your airplane directly from the simulators, this code must be included in the livery name of your airplane.
To confirm that your airplane model is supported on SimFly, please check the Marketplace first. If your airplane is listed but you still receive the message “This airplane model is not yet available on SimFly,” follow these steps to resolve the issue.
All SimFly liveries include the correct ICAO code for the airplane within their name, ensuring they are recognizable by the Client.
For a complete list of ICAO codes, you can refer to this page: https://en.wikipedia.org/wiki/List_of_aircraft_type_designators
For MSFS2020/MSFS2024 Users
If you want to use a third-party livery that does not contain the ICAO code of the airplane, you can add this information with a few simple steps to ensure it is recognized correctly by the Client.
- Make sure the simulator is turned off
- Download the free “MSFSLayoutGenerator.exe” file from GitHub at this address: https://github.com/HughesMDflyer4/MSFSLayoutGenerator
- Locate the livery folder you want to modify using File Explorer. Inside, you will find the “SimObjects” folder and two files, “layout.json” and “manifest.json.” Paste the “MSFSLayoutGenerator.exe” file you downloaded from GitHub into this folder
Correct folder path:
- Go to the “SimObjects” folder, then “Airplanes,” and open the folder with the name of the aircraft
- Open the “aircraft.cfg” file with a text editor
- Locate the “ui_variation” line. In our example, it appears as: ui_variation = “Qatar Airways A7-APC 2024”

- Add the correct ICAO code, such as A388, within the quotation marks, separated by a space. In this example, the line would become: ui_variation = “Qatar Airways A7-APC 2024 A388”

- Save the file in the same location
- Return to the “SimObjects” folder for this aircraft
- Drag the “layout.json” file onto the “MSFSLayoutGenerator.exe” file and release it. If desired, you may delete the “MSFSLayoutGenerator.exe” file from this location
Congratulations! Your preferred livery will now be correctly recognized by our Client. All that’s left is to launch the simulator and enjoy your flight.
For X-Plane Users
To change the airplane’s callsign in X-Plane, follow these steps:
- Open Plane Maker: Launch the Plane Maker program from the X-Plane directory.
- Select the airplane: Click on File, choose the aircraft for which you want to change the callsign, and then click Open.
- Access the “Callsign” section:
- Go to the top menu and select Standard > Point of View.
- In the window that opens, you’ll find the Callsign field in the top left corner, where you can modify the callsign.
- Save your changes:
- Close the window to return to the main screen.
- Go to File > Save As and save the file with a new name.
- Replace the original file:
- Go to the main X-Plane folder, open the Aircraft folder, and then the specific folder of the modified airplane.
- Paste the saved file into the airplane’s folder, ensuring the file name matches the original file so that it overwrites correctly.
Following these steps will update the airplane’s callsign in X-Plane.
Resolving Connection Errors for X-Plane #
If the client displays a connection error due to occupied ports, follow these steps to resolve the issue.
Error Message:
Connection Error: The ports required by the client are already in use. For X-Plane, you need to modify the port value in the ini configuration file with an available port on your system.
Find the ini File:
The client includes a built-in feature to quickly access the folder containing the ini file and log files.
To use it:
- Launch the client and go to the Settings section
- Select the Open Log File Folder option
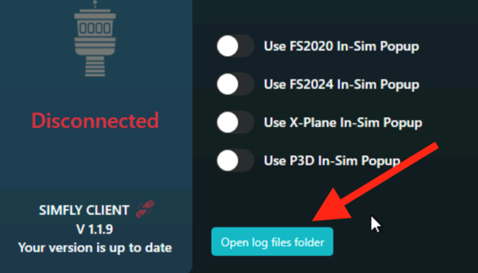
This will automatically open the folder containing the ini configuration file and log files.
Modify the ini File:
Once you locate the ini file, follow these steps:
- Open the File: Use a text editor, such as Notepad on Windows, to open the config.ini file
- Locate the Port Line: Look for a line similar to this: port=49000
- Change the Port Value: Replace the port number with a free value, for example: port=49010
- Save the file and close the text editor
After saving the changes, restart both the client and X-Plane to ensure the error is resolved.
Helpful Notes:
– Choose ports between 49000 and 49100, as these are typically available for custom applications.
Help #
By clicking on “Help” in the left menu, your browser will open directly to our support page, where you can contact us for technical assistance. We commit to evaluating and resolving your request as quickly as possible.
Ensure Active Status of the SimFly Icon (only for MSFS2020/MSFS2024) #
For Microsoft Flight Simulator 2020/2024 users, it is critical to ensure that the SimFly icon in the simulator’s toolbar is active before initiating any flight.
For Miscrosoft Flight Simulator 2020 the icon should display a white background to signify its active status.

For Miscrosoft Flight Simulator 2024 the icon should display a small dot on the bottom right to signify its active status.
![]()
It is vital to maintain the icon’s active state for the entire duration of the flight, from the beginnig to the completion of the mission. This guarantees that all SimFly functionalities, such as flight tracking, activity logging and SkySentinel, operate effectively and are accurately recorded within the system.
Release Notes #
The “Release Notes” section highlights the ongoing efforts of our technical team to enhance your flying experience, ensuring smoother and more enjoyable flights.
Closing Procedure #
Important: when you click the “X” to close the SimFly Client, the program doesn’t shut down completely, but continues to run and moves to the hidden icons area in Windows. To completely exit the Client, you need to reveal the hidden icons, right-click on the SimFly icon, and select the option to confirm closure.
